11 December, 2011

Root Samsung Galaxy Nexus via ADB [How to][Tutorial]


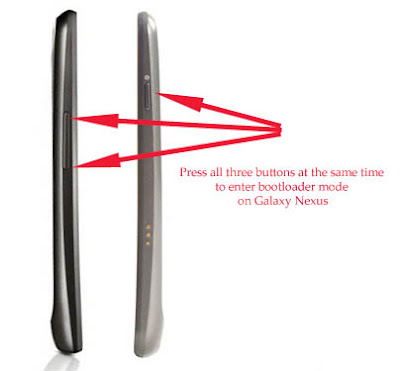
Want to gain root access on your Galaxy Nexus. Here is a quick guide to help your root your Ice Cream Sandwich smartphone using ADB aka Android Debug Bridge. As ADB is available for all major platforms like Windows, Mac and Linux, Rooting Galaxy Nexus is possible on any PC running any of these three platforms.

If you don’t already have ADB on your mac or Windows PC, then check out the tutorial for Windows Here and for Mac here.

After you have setup ADB, you will need to download two files to complete the process.


STEP 1: Extract both the RAR files that you have just downloaded.
STEP 2: Copy the required Fastboot file depending on your platform to ADB folders. For Ex: If you are using Windows, copy fastboot-windows.exe to ADB folder. Same in the case of mac and linux.
STEP 3: Turn on USB Debugging on your Galaxy Nexus.
STEP 4: Install Driver from the Galaxy Nexus Manual Root folder. File name is Samsung_USB_Driver_for_Moblie_Phones_v1_4_6_0.exe
STEP 4: Connect Galaxy Nexus to your computer via the microUSB cable and check if ADB is working properly by running adb devices in the terminal or command line. If it shows Galaxy Nexus, then you are good to go to next steps, else properly install ADB.
STEP 4: Turn off your Galaxy Nexus
STEP 5: Turn on your Galaxy Nexus in Bootloader mode [How to do that – Press 'volume up' and 'volume down' and ‘power button’ at the same time] [See the image below]

STEP 6: Run the following commands in Windows.

fastboot-windows oem unlock

For MAC and Linux use the following commands

fastboot-linux oem unlock
fastboot-mac oem unlock

STEP 7: Press Yes on your phone once it asks your confirmation to unlock the bootloader.

STEP 8: Run the following command

fastboot boot boot.img

STEP 9: Your Galaxy Nexus will now reboot. Make sure to enable Debugging.
STEP 10: Run the following command, one by one and make sure to keep the right path to the files being pushed. 

adb root
adb remount
adb push su /system/bin
adb push Superuser.apk /system/app
adb shell chmod 06755 /system/bin/su
adb shell chmod 06755 /system/app/Superuser.apk
adb reboot

STEP 11: Your Galaxy Nexus is rooted, enjoy
In case of any issues, consult the original forum thread over here.

Unlock Galaxy Nexus Bootloader [How to][Guide]


Want to unlock the bootloader of your Galaxy Nexus; here is a quick tutorial that should help you. Being a Nexus smartphone, unlocking the bootloader of Android 4.0 powered Samsung Galaxy Nexus is fairly easy, but you need to be sure by unlocking bootloader wipes your phone, so your phone will be back to factory state after the following steps are completed. So make sure to make a backup the necessary data/SMS/Call log etc.

STEP 1: First download this file (r3-galaxynexus-superboot.zip)
STEP 2: Download PdaNet and install, it installs the required drivers to work with the following steps.

STEP 3: Extract the download zip to a folder using Winzip, WinRAR, 7Zip or any compressing application of your choice.
STEP 4: Turn off your Galaxy Nexus
STEP 5: Turn on your Galaxy Nexus in Bootloader mode [How to do that – Press 'volume up' and 'volume down' and ‘power button’ at the same time] [See the image below].

STEP 6: Go to the extracted folder and press SHIFT and right click, then click on “open a command window here”.

STEP 7: Type fastboot-windows oem unlock in the command window and hit enter.

STEP 8: Your Galaxy Nexus will ask you that whether you are sure that you want to unlock bootloader, press YES.

You are done, enjoy. Now if you also want to root you Galaxy Nexus, then follow the guide at this link from STEP 6.

10 December, 2011

Root Kindle Fire [How To Guide]

Are you an owner of Amazon Kindle Fire and want to get root access on the tablet, then this guide should help you. Rooting Kindle Fire is a fairly easy process for most of the part, you will however need a few files to make it possible.

Requirements:


Steps to root Amazon Kindle Fire

  1. Unzip Kindle driver file.
  2. Rename the unzipped folder to .android (Keep that dot in the folder name)
  3. Copy .android folder to C:\Users\”yourusername”\ (Yourusername is the user name on your PC)
  4. Connect Kindle Fire to your computer with a microUSB cable. You will get the “can't find the driver” error from Windows, which will give you the option to search from Windows Update. Cancel it and click 
  5. Disconnect on Kindle Fire (don’t remove the cable).
  6. Then open Control Panel and go to Device Manager, here you will find "Other Devices" section, Double Click Kindle and then click on Update Driver.
  7. You will be prompted, Choose “Browse my computer for driver software” and then browse to the .android folder and select next, you might get a warning about the file being unverified, allow it and finish.
Hard part is over now.
  1. Now open the unzipped SuperOneClick folder
  2. As your Kindle Fire will still be connected via usb cable, click on the SuperOneClick app file.
  3. Click on Root in SuperOneClick and just follow the easy instructions. After finishing SuperOneClick will ask if you want to verify whether tablet has been rooted or not, select yes and you will see a superuser permission box on your tablet, which means it is rooted.
  4. You are done for now.

Root Samsung Galaxy Ace [How To]

Want to root Samsung Galaxy smartphone; here is a quick guide for you. You need a few files that have been mentioned below to complete this process.
 - Samsung Kies (Official Samsung site: http://www.samsungapps.com/about/onPc.as)
 - SuperOneClick 2.1.1 (here: http://forum.xda-developers.com/showthread.php?t=803682)


  • Install Samsung Kies, it will install the proper drivers needed for your phone 
  • Turn on your phone 
  • Enable USB Debugging at Setting>Applications>Development 
  • Now, check the Android version on your phone. You can do this by going to Settings>About


IF you have Android 2.2.1

  1. Connect your phone into PC via cable
  2. Launch Super One Click 2.1.1
  3. Click "Root"
  4. Wait until the program will root your phone
  5. Reboot 

OR

If you have Android 2.3.3/2.3.4/2.3.5

  1. Download upd_1.zip
  2. Copy upd_1.zip to your sdcard
  3. Turn off your phone
  4. Press POWER+HOME BUTTON
  5. Apple Update from sdcard, select the file upd_1.zip
  6. After the update completed - reboot
  7. Voila you are done.


Google Currents on Kindle Fire [How to] [APK Download]

As you would have already heard that Google has released its Flipboard competitor "Google Currents" in the United States recently. Similar to other Google applications, it is not available in the Amazon App Store, so you will need a workaround to install this application your Amazon Kindle Fire.

First you need root access on your Kindle Fire - You can find more on how to root the tablet here.
Now, you need to grab root explorer or any other file explorer from Amazon App Store that can give you access to system folder and make it writable.
Then you will need to download Kindle Fire APK from here.
Now, follow this guide to install Google Currents on your Kindle Fire.

Bonus: You can follow this tutorial to install Android Market on your Kindle Fire.


28 June, 2009

Order HTC Hero today for $710

If you are smitten by the looks of new Android powered HTC Hero and can't wait to order it and fortunately you live in UK, then according to phandroid and Amazon, now you can pre order your own HTC Hero today for just $710 at Amazon, which will reach your doorstep on July 15(tentative).

Spain gets Android powered "GeeksPhone One"

Spanish firm GeeksPhone launched its and Spain's first Android powered phone today. It is called "GeeksPhone One".
It comes home with Android cupcake upgrade and hosts some really nice features including 625 mhz quadband Edge Plus HSPDA, Bluetooth, WI FI, 3.2 mp Camera with front cam for video calling, 3.2 inch Touchscreen and Micro SD expansion.


27 June, 2009

European carriers to go Android way

via Digitimes
The four major telecom service providers in Europe - Vodafone, T-Mobile, Orange and Telefonica/O2 - all plan to launch Android-powered handsets in the second half of 2009 instead of their previous focus on Windows Mobile-based models, according to sources from Taiwan's handset industry.

The move is likely to gradually eat away the global market share currently enjoyed by Windows Mobile phones, the sources commented.

T-Mobile will spearhead in the launch of Android-powered phones, with plans to introduce Google phones coming from High Tech Computer (HTC), Samsung Electronics, Motorola, and Huawei Technologies, while Telefonica/O2 will begin to market Samsung's first Android-based handset, the i7500, at the end of this month, the sources noted.

WiMAX Android Phone on Sprint?

via Salon:
A rumor has appeared that has Sprint planning to release an Android phone this year or next that is CDMA/WiMAX-capable. This is certainly an interesting proposition.
Sprint is one of the companies that has been pushing for a big WiMAX rollout.
WiMAX is one of those technologies that sounds so good on the surface that it’s easy to get excited about the thought of high-speed connectivity everywhere. The problem is the everywhere part, and that is killing off the enthusiasm quickly.

26 June, 2009

Google Brings AdSense To Android Apps

The search giant’s approach to the mobile web has been fairly cautious, though it began fashioning its AdSense and AdWords system for mobile nearly two years ago. The tests have been limited to just those four developers, but Google is now opening the beta to a more developers who meet the company’s “specific criteria,” which includes a minimum of 100,000 daily pageviews, a willingness to go live with ads in four weeks. Developers also have to agree to a 3-month commitment. The AdSense for Apps is only available for Google’s Android and the iPhone. The site for developers is now live here.
The introduction of AdSense for Apps follows AdMob and others that already offer in-app advertising. The new program also fleshes out Google’s overall plan for mobile ads, which was revealed last February.

Android dev get native-code kit

Via Cnet
A native application development kit has been released for Android developers, offering a way to create certain kinds of high-performing applications for handsets running the Google platform.
This approach would not ordinarily produce a massive performance boost, but it does allow developers to reuse existing C and C++ code for Android applications.
Android engineer David Turner wrote in a blog post that the NDK, which is an adjunct to the standard Android software development kit (SDK), could be used for writing higher-performing applications, but also had its drawbacks.
"Your application will be more complicated, have reduced compatibility, have no access to framework APIs, and be harder to debug," Turner wrote. "That said, some applications that have self-contained, CPU-intensive operations that don't allocate much memory may still benefit from increased performance and the ability to reuse existing code. Some examples are signal processing, intensive physics simulations, and some kinds of data processing."

24 June, 2009

HTC Hero to have Flash support

As per the recent news HTC Hero will become the first Android based phone to come inbuilt with Adobe Flash Support. Adobe and HTC both are working on to make Flash support a success on Android, which would entitle this OS users a more complete browsing experience.
This would also let Android users use most of the Flash based web services. Currently only Windows Mobile OS has the flash support, while Adobe is still working on for iPhone.
As most of the web based video experience depends on Dobe Flash technology, it becomes imperative for companies to let users get flash support on their phones.

22 June, 2009

Google phone in India finally

Taiwanese cellphone maker HTC is all set to launch G2, or the second generation premier Google phone that runs on Google's Android operating system, in India soon. It is likely to be priced between Rs 26,000 to 28,000.

The company is planning to sell the unlocked G2 Android phone through a large telecom service provider, most likely Airtel, according to sources.

However, it has no immediate plans to retail the same through Vodafone with which it has a tie-up to sell G1 and G2 in most other regions, including the entire Europe.

The phone is likely to be bundled by the telco with talk time, data plans, microSD card for storage and other offers which will make it a compelling buy for the consumer. But it being unlocked means

T-Mobile myTouch 3G is now official | To go on sale in Aug

T-Mobile USA, Inc. announced the upcoming availability of the T-Mobile myTouch 3G, the highly anticipated follow-up to the T-Mobile G1, the world's first Android powered device. The company said that myTouch will be available to pre-order starting July 8 for $199.99 with two-year agreement.
The company said that the myTouch features multitasking capabilities and one-touch access to Google Inc. (GOOG: News )services including Google Search by voice, Google Maps with Street View, YouTube and Picasa. It also provides easy access to both personal and corporate e-mail, including support for Exchange, Gmail and other POP3 and IMAP e-mail services and synchronization with Google contacts and calendars.
The myTouch 3G will feature a 3.2 inch HVGA capacitive touchscreen display, quadband GSM/EDGE, quadband HSPA, Android version 1.5 which features an on-screen keyboard, video recording, media player.

The rest of the featureset consists of Wi-Fi radio, Bluetooth with stereo audio support, microSDHC expansion slot, A-GPS support with compass, accelerometer, voice control and speakerphone along with a 3.2 megapixel camera. The device will be available for pre-order on July 8th and ships on July 29th for current customers who upgrade, with retail availability slated for early August at a cost of $199.99 after new 2 year agreement and rebates.

21 June, 2009

ConveyThis Translator for Android

The ConveyThis Translator app puts all the power of the ConveyThis website translation widget right into your hands—literally! Instantly translate any word or phrase into nearly forty languages (including almost every language supported by the ConveyThis widget), and even hear the translation read back to you loud and clear! It's fast, easy, and a lot of fun, and of course, because it's from ConveyThis, totally free!

How do I install it?

Access the Android Market on your handheld device. Locate the ConveyThis program in the listings (listed under the Communication apps, and free), then follow the standard app installation procedure. (Check your device's manual or on-screen instructions for more detailed infiormation).